This page serves as a guide for those wanting to recreate/replicate the textures and texturing methods used for the vanilla contents of the game.
Some of these are the exact methods Moonbyte used when creating the game, but others are merely recreating the textures with more modern and different means.
Partially, this page will refer to modelling or UV-mapping for full explanation of some methods, so some level of 3D- and image editing program skills are required.
Paint.net and Blender will be used as the default softwares here to demonstrate the methods, which more or less can be translated to other programs.
General Tips
Most games (which includes Crashday) can most efficiently use texture that are the powers of 2, most commonly 256x256, 512x512, etc.. The aspect ratio can differ from 1:1, (for ex. be 512x256). The vanilla texture dimensions will be explained specifically in parts of the guide.
Looking at, and studying vanilla game files plays an essential part in understanding and replicating them, so it’s highly recommended to do so, both when starting out, or with experience, looking to refine your work.
Main Textures
body.tga
body.tga is the main paintable texture on the car. It’s body.tex uses a diffuse enviroment map shader type, which gives it the reflective clearcoat look. The resolution is 512x512 pixels for all vanilla cars.
It can be divided into 3 main layers:
Ambient occlusion (AO) map/texture
Doorgaps, details
Background Color
The Ambient occlusion texture can be baked/generated in 3D programs. It’s the natural shading the model receives, from it’s own and surrounding geometry, independent from external lighting.
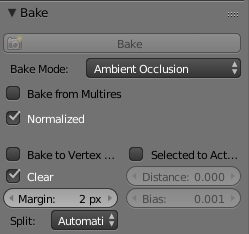
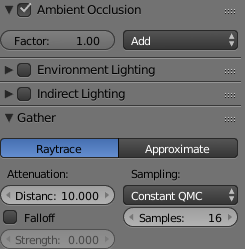
The settings below provide a fast bake and a good base to work on (demonstrated in Blender 2.79):
Render tab
World tab
It’s recommended to bake in a 2x or 4x higher resolution (1024x or 2048x) and then downsize the image to 512x in a program of choice, to create natural anti-aliasing on the edges of UV islands and smooth off sharp edges on seemingly smooth parts (caused by normal imperfections). For these reasons, it’s also good to choose a resize type that creates the most blurry result (Bilinear or Fant, but Super Sampling can also work).
Usually, even the downsizing doesn’t make the sharp lines disappear, in which case, a type of Surface Blur needs to be used (Surface Blur named effect itself, or the Smart Blur plugin for Paint.net). For best effect, carefully finetune the Radius and Strenght values, to only blur the neceserary lines, and not get rid of smooth transitions.
It’s good to have a smooth and pronounced fade from the top of the car from the bottom, for the most vanilla effect, with the top of the car 100% bright, white (about 255 RGB) and the bottom part 50% bright, grey (about 127 RGB). Darker greys can appear for well hidden geometry, but avoid pitch black parts. Use the Brightness/Contrast adjusters for this in your program of choice.
The Doorgap layer(s) is/are self-explanatory. It has to be noted that it darkens according to AO shading in vanilla cars. The best way to replicate that effect so far, is to draw the doorgaps in a 127 RGB grey, and set the layer type to multiply. Altho this will mean that the fake, white emboss/depth effect has to be added on a seperate, in this case additive layer. You can copy the drawn lines from the multiply layer, and offset them 1 pixel in different directions depending on their position, on the additive one for this effect, but either darken their color, or set the latter layer’s opacity to about 110-120 (35%-45%), to make the effect darker. The doorgaps are always drawn with 1 pixel thickness, usually with a line tool.
Other details mean the minigun bolts (1 pixel dots), doorhandles (usually drawn with 1 pixel thickness), or small ventillation holes (like on the ‘Horze or ‘Spitter).
The Background Color is just a simple, single color fill to get rid of the transparency below all the layers above. It should be an average of the greyscale colors on the body, so a somewhat light-mid grey, in case the UV islands show it’s borders/outlines when looking at the car from a distance.
As a last step, the whole of the texture needs to be transparent to be paintable, which means giving it a fully black alpha layer. For an explanation of the alpha channel, visit the Paint.net tips and tricks page.
This page will cover the creation of a livery, both in creating a texture, and placing said livery ingame. This guide will assume that you already have a basic knowledge of your choosen image edtior, and can follow the more technical terms used.
Files and Textures in general
This part will be compatible with any image or text editing tool you use, as it’ll refer to standard features that can be found in most of these programs.
Files
Liveries, just like all tuning parts, need a .tun and a .lst shop file to function, in addition to the livery texture(s) in content/textures/`carname`/`filename`.tga
Refer to the File Types Documentation section and game files for setting up a new tuning part.\ The prefered format for livery textures is .tga\ Unlike other textures, it’s not needed to create or copy a .tex file for the livery file(s).
There’s a so-so bug in RE where if the .tex file of the livery doesn’t match the body texture’s, it’ll make the game error with a Width == Width message. It’s better to not add a .tex file at all, as it’ll use the texture it’s assigned to’s .tex anyway.
Textures
The method vanilla liveries use for preserving the Ambient Occlusion (shading) on the car texture, is applying the livery on a layer with a Multiply type, which will apply the the colors of the livery to the layer below, in this case, the car body texture. The side effect of this, is that you’ll need to remove the body texture from the parts you want paintable ingame.
This is where you’ll manipulate the Alpha Channel of the texture once you are done with it. For a more throught explanation of them, visit the Paint.net tips and tricks page (not necessarily made for Paint.net users).
Advanced and specific texture guides
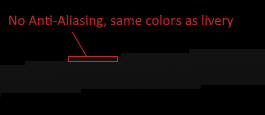
Avoiding anti-aliasing artifacts
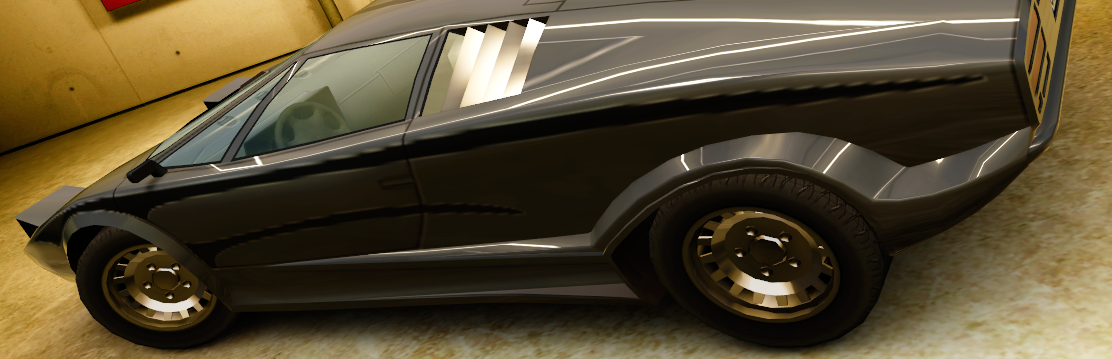
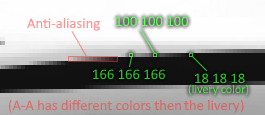
You may notice that your textures have white jagged outlines on an otherwise dark colored livery (Judge 4000VT mod for demonstration).
This is because the Anti-Aliasing on the livery isn’t the same color as the livery itself, as it’s applied on top of the light colored body texture.
Technically, only the image you’ll apply as the alpha will need the anti-aliasing, as that one acts as the cut-out for the livery, and defines what part of it appears ingame.
Method 1, Revealing Alpha:
This is the more universal solution for liveries, as it’ll work with most of them, but it will mainly be demonstrated in, and will use Paint.net features, with help of the Alpha Mask plugin.
First, the livery needs to be finalized, with a project file saved with the layers still not merged, in case further livery modification is needed for the future.
Then, if there are multiple layers for the livery itself, all of them need to be merged into one layer, but without merging them with the body texture itself.
Then, an alpha mask needs to be created like normal for the livery, which simplified, is copying the livery layer, creating a new image window, making two layers, coloring the bottom one black, and pasting the livery on the top one, applying a Hue/Saturation (or HSV in some programs) adjustment on the livery layer, with Lightness set to 100 (making the livery layer fully white), then Flattening/Merging the layers.
Proceed back to the main image window with the livery and body texture, and use the Alpha Mask plugin Effect on the livery’s layer, with none of the boxes checked. This will make the Anti-Aliasing fully opaque, and getting rid of it in the process. This can make the body texture disappear where the livery isn’t present, but due to the way livery applying is made ingame, it won’t matter (explained later).
If you happen to have dpy’s plugin pack for Paint.net, you can use Alpha_to_255 in Effects -> Colors on the livery layer, and it’ll have the same effect as Alpha Mask with no box checked.
Demontration:
Then, you need to flatten/merge the image, go to the other image window, copy the image to clipboard we made as an Alpha mask in the, go back to the main image window again and use Effects -> Alpha Mask, this time with Paste to Clipboard checked.
Carlogos for default cars have a consistant style to them that’s art can be replicated. But what reoccuring features there are?
From that combined picture you can already see the consistancy shown in default carlogos:
The main car name is always in white (except the Spectran because Crashday) and everything has a 1-2 pixel shadow offset.
You can also see the variety of fonts used, mainly that the main name’s font often differs from the miscellaneous model names next to it (great examples are the Buster’s and Bornbad’s).
A variety of colors are used, with not that much consistancy between them, but they are always used for the model name, or at least part of it. Other colors, like blue don’t actually appear for default cars, but for your creations, a tastefully choosen color can feel just as natural as vanilla logos do (good example is the Cube’s RS, only car to use green).
For colors other then white then sometimes you can also notice white outlines given to said shapes or letters, but only in some instances, like the Cube’s RS or the Hunter’s shape/box.
The scale and transform of the letters can also vary. Not only some text is marked in bold or italics, you can also see the V8 being much bigger on both cars it’s displayed on, you can see the differing space between Motors‘s letters on the Ironhorze, and the V12 being squashed down on the Incubator, it’s played around with on every carlogo.
Lastly, you can also notice simple, small shapes on some of the logos, mainly the Cube’s or Pickup’s, and it’s also used as background for other car’s letters like the Hunter’s and Apachee’s logos.
With all these in mind, and some experience, similiar logos for your (lore-friendly) cars can be created aswell! You can see some examples on the right side of the image, all of which tried something slightly new, with still being honest to the tecniques above:
The Incubator RB’s logo only has a new color introduced, being a darker then usual grey, while still fitting, which proves that there can be experimentation with colors not used in vanilla.
The Fireburnz’s only elaborates on this further, intentionally looking similiar to the Firespitter’s logo, but with a still very fitting light blue as an accent color for the modelname.
The Trance-Mortar’s tries something new in a different area, being shapes, as it uses a more elaborate, sort of text encapsulating graphic, intentionally showing similiarity to the Cube’s logo, trying to create some continuity with the two cars.
This guide mainly shows the limits of these textures, but I ultimately encourage anybody to get familiar with the lore and style behind it, and with enough creativity, try and push the style a bit more, for nice variety.
Shared textures are textures that you can use in your model, without needing them in your mod’s .cpk. Every texture that’s located exactly in the textures folder, is considered a shared texture and can be used by any other mod. This includes the textures of all tiles, dynamics, pickups, wheels, drivers, etc.
The most important textures are the ones the base game cars use for miscellaneous parts, like rubber, glass, carplas2. These are just textures with usually a solid color, but with carefully made .tex files to make them look like their name would suggest. It is recommended to use these in your mod, because most of the time it’s a simple time save, but adds much quality. Here’s most of them:
“carplas2” Perhaps the most commonly used and best looking shared texture, just a simple grey/black plastic texture. Could be used for any simple plastic part and even full bumpers.
“carplas3” A reflective, black plastic texture. Could be used for the trim on the edges of glass for example. (the part connecting the roof and body on the Apachee for example)
“rubber” As the name suggest, a black rubber texture. Mostly used to seperate the car body and the windows.
“glass” Reflective, transparent glass, with a slight bit of a blue tint. Used for car windows. Has a damage map counterpart named “glass2” (use that to UV map your windows to).
“carplast” A light grey, bright version of carplas2. Rarely seen use on cars.
“lighchrm” A quite reflective chrome texture. Mainly used for chrome like surfaces in headlights, though can be used for other smaller parts like exhausts or trim pieces.
“chrome01” The main chrome texture, a slight bit darker and less reflective then lighchrm. This is the intended texture for trim pieces, and other bigger chrome parts. (The Ironhorze’s trim pieces for example)
“chrome02” An alternative to “chrome01”, slightly brighter version.
“colblck”, “colwhite”, “colred” and “colgrey” Non reflective, just solid colors of black, white, red and grey respectively.
Crashday has multiple launch parameters but sadly none were described by the devs. If you find how any of the parameters behave and it is not written here already, let us know!
To launch a game with any of the parameters, right click the game in Steam, select Properties, click “Set Launch Options“. Write any parameters you want, separated with a space.
Here is a list of known parameters:
-windowed (Launches the game in window)
-skiplauncher (Skip the launcher and load the game with the last used settings)
+connect_lobby lobbyid (instantly connect to the lobby with given lobbyid on launch)
+connect (unknown? same as +connect_lobby?)
+password (use this password when joining a lobby)
-watcher
-override_mods
-show_diffuse
-show_shadows (in game will show were textures are applied by the game. Textures will be white)
-show_texture
-show_alpha (instead of the textures will draw it’s alpha channel)
-disable_postfx (disable all screen effects when drawing)
All CD:RE files and mods are stored inside .cpk files. These files are just .zip archives and contain all of the game’s content. If you go to the ...\Crashday\data folder you will find all of the game’s .cpk content packages. Please note that you are not allowed to edit default game files and the game will crash if you try to edit them. For editing content you need to create a custom mod.
For easier distribution CD’s content is divided into several packages, each containing some type of files.
data000.cpk - Common files
data001.cpk - Music
data002.cpk - Ambience related files
data003.cpk - Car related files
data004.cpk - Vegetation related files
data005.cpk - Dynamics related files
data006.cpk - Tile related files
data007_.cpk - Translation files (depends on which language is selected in steam)
a - English
b - German
c - Italian
d - Russian
e - Turkish
f - Hungarian
g - Brazilian
h - Spanish
i - Polish
If you are planning to mod the game, you would generally unpack all useful packages in the same folder(you probably do not need the Music one). This would give you all of Crashday’s unpacked content which can be edited(but not loaded) and used as reference.
While making mods for Crashday you may encounter a lot of different crashes and bugs. Problem is, the error messages were meant for developers so they don’t usually give enough info about how you would fix the given bug. But usually it is possible to pinpoint the problematic file and fix the error. For this purpose here is the list of well-known errors and their possible causes.
If you found any error which is not on that list, please report it to the modding channel in Crashday Discord.
Assertion failed
Generally these errors appear when the game got a value it did not expect to. If the game expects a mass as integer on line 3 in some file but finds a great meme this error will appear. Even then, we still can differ between different assertion fails.
Wrongly specified amount of tuning items at the top.
Line 3 should be empty.
size<BM_BYTESPERBLOCK
Exact message:
1
2
3
4
Assertion failed! size<BM_BYTESPERBLOCK
(file ..\code\game\propcore\tools\memblock.cpp, line 52)
Problematic file: unknown
Possible causes:
This error appears when the game tries to load a file bigger than it can handle. Usually none of the text files should exceed this limit so the most possible reason is too big .p3d file.
If it’s a .p3d model chances are you have to many polygons. Reduce to 58k.
wheelwidth > 0
Exact message:
1
2
3
4
Assertion failed! wheelwidth > 0
(file ..\code\game\carspecial\skidmark.cpp, line 39)
Problematic file: .p3d model of the wheel
Possible causes:
No “main” mesh found in the model.
mass > 0
Exact message:
1
2
3
4
Assertion failed! mass > 0
(file ..\code\game\dynobj\dynobj.cpp, line 529)
Problematic file: unknown
Possible causes:
Faulty mesh?
Some dynamic or a car has a zero mass.
you’re assuming errors make sense
that’s a rookie mistake
@Mica
Others
invalid NumPlate-value
Exact message:
1 2 3 4 5 6
The car file contains an invalid NumPlate-value! Possible is 'wide', 'narrow' or 'us' file = filename
(this message was produced in: ..\code\game\carobj\carspecs.cpp, line 274)
Problematic file: carinfo.cca. In the error message file = parameter should show what car caused the crash.
Possible causes:
You defined a non existent license plate e.g. narow (one r is missing).
The engine expected another value at this line position. This probably means you missed some value, added one extra. Possibly incorrect number of damage textures is present.
Expected physics section but found
Exact message:
1 2 3 4
Expected physics section but found file = *filename* (this message was produced in: ..\code\game\carobj\carspecs.cpp, line 390)
Problematic file: carinfo.cca. In the error message file = parameter should show what car caused the crash.
Possible causes:
Number of gear rations is not equal to the amount of gears actually present in the config file (should be number of gears + 1 for rear).
The engine expected another value at this line position. This probably means you missed some value, added one extra.
Unsupported type for shop article!
Exact message:
1 2 3 4 5
Unsupported type for shop article!
TempName = *partname* (this message was produced in: ..\code\game\user\shop.cpp, line 645)
Problematic file: shop.lst.
Possible causes:
Part group specified incorrectly. Check .cdo file definition for possible variants.
The engine expected another value at this line position. This probably means you missed some value or added one extra.
Error: texture couldn’t be found!
Exact message:
1 2 3 4
Error: texture could't be found! textureFile = *texturePath* (this message was produced in: ..\code\game\propcore\texture\cbm.cpp, line 352)
Problematic file: missing texture, carinfo.cca.
Possible causes:
The game looks for the texture which is actually missing. Possibly wrong path or name is used somewhere.
One mesh is listed twice in carinfo.cca mesh list.
Could not allocate Index Slot!
Exact message:
1 2 3
Could not allocate Index Slot! (this message was produced in: file..\code\game\propcore\object\batch.cpp, line 208)
Problematic file: .cat
Possible causes:
You forgot a tile name or did not specify the position with auto positioning turned off. Visit file definitions for .cat files for reference.
Crashday has a lot of different files used for different things. Generally there are two types: text and binary ones. Binary files can only be edited using special programs, plugins or the game itself. Text files can be opened with any text editor, though using notepad is not recommended.
All the text files are based on the same format:
Every line is important. The game will look for a certain variable on a certain line position, so don’t add any additional lines etc.
After every line you can add a comment using # symbol. Everything after it on the same line will be ignored by the game.
CD uses a dot to represent decimal numbers e.g. 1.23
Colors are represented as RGB, channels are separated with a space e.g. 255 255 255 is white color.
Text based files
.amb Ambience definition
path: content/ambience/
Ambience files are used by the game to change weather. In general it is a way to change how light, reflections and sounds work in the level. Here is a cleaned up version of CD’s day.amb
PropsFX-Ambience-File # defines a start of an .amb file - # name of ambience (overwritten by localized data for default ambiences) ambience/day # texture set for the ambience (lut, background, skybox, sun). First part is the folder name inside textures folder, second is the start of the file name the game will look for(day_bg, day_lut etc.) 219 186 149 # sun color 1 # maximum sunlight strength 2 # power exponent of sun light 97 111 131 # ambience sky color 45 49 54 # ambience ground color 0 0 0 # absolute ambience minimum 255 217 175 # specular reflection color 170 170 170 # darker dense vegetation render color (e.g. treetops) 190 190 190 # brighter vegetation render color (e.g. grass) 0 -0.6 -0.8 # sun light vector 90 # additional rotation of sun vector 1.0 1.0 1.0 1.0 # screen gamma 1 # apply gamma to sky? 55 55 55 # texture color filter 0.0 # strength of color filter 0.1 # strength of color filter on car (defines how much the car's color is "greyed out", to not oversaturate) use_colormap 3 # number of ramp points 0->0 127->128 255->255 # ramp point 1 0->0 127->128 255->255 0->0 127->128 255->255 69 78 91 # fog color for looking into normal scenery 0 0.5 # fog amount (min,max) looking into normal scenery 93 103 115 # fog color for looking into sun haze 0 0.5 # fog amount (min,max) looking into sun haze ambience/day.wav # environment sound in sounds folder 0 0.2 0.8 # sunflare vector 255 228 173 # sunflare color 300 300 # sun corona width/height 5 5 5 # object shadow color 0.4 # max shadow alpha density 1.0 1.0 1.0 # reflections: min/max/fresnel scaling coefficients 0 # turn on headlights for cars 255 255 255 # color tint for the lensflares/coronas in this ambience. 255,255,255 means no tint. 0,0,0 makes flares invisible 70 78 78 # the color for the bottom of the scene background 0 # rotational angle to correct the envmapping directions 0 # [optional] force music off (useful when hacking envsound with a soundtrack)
ladder.lst Career opponent list
path: content/career/ladder.lst
Ladder list defines the names of opponents in career mode. Opponent names in quickplay can be found in translations files.
Crashday-CareerLadder # defines a start of ladder.lst 21 # number of opponents 1 # Randomize opponent names? James|Hamilton amateurs # Name|Surname league George|Rush amateurs Emmett|Brown amateurs Kevin|Hale amateurs Donald|Spikes amateurs Mia|Tsukamoto amateurs Steve|Jarvik amateurs Percy|Kay amateurs Waldo|Silver professionals Isaac|N. professionals John|Williams professionals Jules|Ash professionals Robert|Patch professionals Joe|Eastman professionals Kanzan|Tsukamoto professionals Vincent|Dust final Maurice|Kane final Lance|Cartwright final Ryan|Whitney final Tyreece|Moore final \1THE|INCUBATOR lastmission
.lst Shop list
Shop lists are used to display what can be bought in the shop. There are three main lists:
content/shop/cars/carname/ items will show up for the given car. In these files you want to specify vinyls, car perf upgrades etc.
content/shop/cars/weapons.lstis a list of available weapons in game and will show up for every car under weapons category. Usually you don’t need to edit this, unless you want to change some weapon’s shop stat.
content/shop/ items will show up for all cars. Generally the only thing you want there are wheels
Every .lst files consists of a first line and then any amount of entry blocks separated by an empty line.
1
Crashday-ShopDataList # defines a start of a .lst file
an example of an entry block:
1 2 3 4 5 6 7 8 9 10 11 12 13
Next: #--------------------------------------------- crsh1 # identifier name crashpower # group (car, fbumper, rbumper, sidekit, hood, rwing, wheels, performance, weapon, skin, cassis, armour, crashpower) NONE # parent object (e.g. car folder) or NONE $ID trkdata/cars/apachee/shop.lst crsh1.Name # Article name (English) DEPRECATED # UNUSED article description (English) aftercarbought # availability condition 0 # UNUSED show media _before_ available NONE # UNUSED media showed when available (can be NONE) 8000 # cost to buy in shop NONE # UNUSED shop picture 0 # is this a stock car part? 0 # !IMPORTANT! - Is mod content? This must be set to 1 if you are creating additional items for the shop. Used to properly save kits - Outblast.
If you want to add any part to the car, not only you have to have it in the model and listed in carinfo.cca, you will also need to create an .lst entry for that part. For every new car you also have to create a car entry, usually looking like this:
1 2 3 4 5 6 7 8 9 10 11 12 13
Next: #--------------------------------------------- *currentcar* # identifier name car # group (car, fbumper, rbumper, sidekit, hood, rwing, wheels, performance, weapon, skin, cassis, armour, crashpower) NONE # parent object (e.g. car folder) or NONE $ID trkdata/cars/apachee/shop.lst apachee.Name # Article name (English) DEPRECATED # UNUSED article description (English) withrespect 1370 # availability condition 0 # UNUSED show media _before_ available NONE # UNUSED media showed when available (can be NONE) 152000 # cost to buy in shop NONE # UNUSED shop picture 0 # is this a stock car part? 0 # !IMPORTANT! - Is mod content? This must be set to 1 if you are creating additional items for the shop. Used to properly save kits - Outblast.
In every block, if the .lst file was loaded in the car folder you can use *currentcar* text. When the game process the file it will automatically replace it with the cars identifier.
There are three possible availability conditions
withrespect [number] This item will unlock after number amount of respect is gained.
aftercarbought This item will be unlocked when you buy a car. Can only be used for items with specified parent object.
always This item will by always unlocked.
nowhere it is specified what car is used, so i guess the parent object is used for aftercarbought condition. But seeing how its named parent object originally and not car parent, makes me think we could define another item or something else as parent? Stackable objects or smth?
.tex Texture shader
path: found in the same folder as any texture you use. Has the same name as the given texture, but the .tex format.
These files define how textures are rendered in game.
1 2 3 4 5 6 7
has_alpha # defines if the texture has opaque places. If it does not, comment out that line or leave it blank. !The line still should be there! # disable_mipmapping # enable or disable mipmaps? default # ingame material type. Options: default, grass, tree, standard or STANDARD. If you choose standard, the file ends here. diffuseenvmap # shader type 0.3 # minimum reflection 0.7 # maximum reflection 3 # fresnel exponent
There are multiple possible shader types. Each of them defines how the following lines are read. Next up you will see a list of shader types followed by their used variables.
specularvertex # diffuse lighting with specular reflection map ultra # minimum graphics quality to activate shader(if user has lower setting, diffuse will be used) Possible options: "ultra", "high", "medium" or "low" _self_ # specular map file. _self_ to use alpha channel of the texture, or name of another texture. e.g. colwhite.tga 0.7 # specular overall strength 2 # specular power exponent 0.9 # diffuse sun light strength
chrome # chrome shader(great job explaining what it actually is) 1 # amount of chrome blended against diffuse
1 2
use_shaderparams_from # reference to other .tex file to pick shader specified there [filename].tex # tex file we copy the shader settings from
These were taken from the old sdk, but looking at the reversed Crashday source code, these were also found: diffuse(possibly one parameter, should be the same as default), specularmapping(first variable is graphics setting, then something else?), alphatest, alphatestdoubleside, alphadoubleside
.cdo Dynamic object definition
path: content/dynamics/
These files define dynamic objects that can be placed on the map. To add an object to the editor, you will also need to add a .cat file
1 2 3 4 5 6 7
Crashday-DynamicObject-File # defines a start of a .cdo file arrowright.p3d # UNUSED? should be the same as the next line arrowright.p3d # model used by the object METAL # material (Options: CARMETAL, METAL, STONE, WOOD, PLASTIC, RUBBER, EXPLOSIVE) 180 # mass in kg(-1 makes object immovable) 0 # UNUSED? amount of force needed to rip the object from the ground 0 -0.2 0 # center of gravity
.tun Tuning definition
path: cars/*carname*/ .tun
These files has a list of all possible tuning parts which the cars could. If you want a part to be purchasable, you also need to define a .lst file for said item.
Generally a .tun files starts like this:
1
2
3
# Crashday Car Tuning definition file 11 # Num tuning items in the file # Empty line
Don’t forget to adjust the amount of items line if you add or remove anything.
after the first block on every line you will have a separate tuning item. Every one of those should start with a unique identifier, which will be used in the shop lists and carinfo.cca to define bot setups.
1
name=meme1 *tuning item*
Every tuning item can have multiple parameters, separated with a space. For parameters starting with add, you can use negative values to remove some amount from that parameter. But be sure that total value would not go beyond possible limits e.g. a part that makes a car negative mass. If the parameter starts without add, it’s value will be multiplied with current value.
Here is a list of possible parameters:
Physical tuning
add_massadd= Amount of mass to add to the car.
add_horsepower= Amount of horsepower to add. This is a cosmetic value showed in garage.
add_topspeed= Amount to rise the top speed by.
add_torquenm= Amount of acceleration torque in Nm.
add_antirollheight= Amount of anti-roll in meters
add_trackfront= Length of the front wheel track. Positive values move the wheels away from center.
add_trackrear= Same as add_trackrear but for rear wheels.
add_wheelposyfront= Vertical position of the front wheels with fully compressed springs.
add_wheelposyrear= Same as add_wheelposyfront but for rear wheels.
brake= Brake strength.
diffratio= Differential value.
energyloss= Amount of energy lost when the car gets hit.
crashpower= Amount of energy car gives to other cars on hit.
deform= Car’s deformation strength.
springstiffness= Suspension spring stiffness.
springrange= Suspension spring length.
springdamping= Suspension spring damping.
DECALS/VINYLS & EFFECT PAINT
decaltype=decal Defines a decal. Has to be present.
decal1= Texture name for the first decal e.g. decal2a.tga. It is possible to add three more decals, just change the number (decal3=meme.tga)
decalcolor= RGB hex color value (without ‘#’ or ‘0x’) to be multiplied with the decal textures.
tex1toapplydecal1= Name of the texture (body2.tga to apply decal1 to. Change the last number to change the decal number applied. Change the first number if you want to apply to multiple textures (text2toapplydecal1=body2.tga should work)
OTHER
add_carclass= Upgrade the car’s class. This can “0.5”, “1”, “1.5”, “2”. An upgrade of “1” is equal to increase the classification by one classification letter, like from a “B” to an “A” car.
engsound= Change the engine sound set.
ignitionsound= Change the ignition sound set.
turbonoise= Change the volume of turbo blow off from 0 to 1.
gearboxnoise= Change the volume of gear box noise from 0 to 1.
backfires= Change the intensity of backfires from 0 to 1.
add_missilecapacity= Amount of starting missles of the car.
shift_exhaust1x= Move the first exhaust on the X coordinate by this value. Change the last letter to y or z to move in other coordinates.
shift_exhaust2x= Same as previous but for the second exhaust.
p3dmesh1= Add a mesh to the car. Parameter can end from 1 to 16.
removemesh1= Remove a mesh from the car. Also ends from 1 to 16. Note that this should be used only to remove non tuning meshes, the ones specified in mesh list in carinfo.cca.
.cfl Field object definition
path: /tiles/
These files are used to add tiles to the game.
1 2 3 4 5 6 7 8 9 10 11 12 13 14 15 16 17 18
Crashday-FieldObject-File - # tile name (in editor, only used for custom tiles, which don't have a category specified) field.p3d # model used by the tile 1 1 # tile size (x y). Each can be 1 or 2 only (10 or 20 meters) GROUND_FLAT # UNUSED? can be GROUND_FLAT GROUND_EDGE or GROUND_SIDE 0 # list the track piece in the editor? If 0 a .cat file will be needed to show the tile in editor NONE # UNKNOWN. NONE or cfl to replace the original when the tile is on slope. Only for 1x1 size tiles 2.0 # maximum random ground shift 1 # after recover, can the player spawn on the tile? 0 # is tile a checkpoint? -8.5 10 8.5 16 # REMOVE THIS LINE IF THE PREVIOUS LINE IS 0. top-left and bottom-right coordinates of the checkpoint plane 1 # is it possible to freely roam across all tile without hitting anything? If 0 requires a .cai AI file. default # dynamic object dropping height. default = +100 meters. Use negative numbers if you want to put objects into tunnels STOP # bend restriction axes separated with a space in any order. Possible values: V1, V2, H1, H2, STOP at the end to indicate the end.
Crashday allows tiles to be bent using heightmaps in editor. Usually for that, tile models are pre-cut every meter. But sometimes you don’t want that, to avoid strange results e.g. misshaped houses on a slope. For that we can use the last parameter in .cfl, to restrain bending on certain axes. Here is an image to explain possible choices.
All distance units in Crashday are measured in meters, i.e. 1 unit is representing 1 meter.
The Crashday coordinate system is defined as follows: when looking “into your screen” the X axis goes from left to right (increasing rightwards). The Y axis defines the vertical direction from bottom to top (increasing upwards). The Z axis is the depth extension and points into the screen.
Car models should be aligned as follows: the car’s front points towards the positive Z direction, i.e. “into the screen”.
Even when working with .dds textures, you should reference to .tga (e.g. if you specify glass2.dds in your car info file, define it as glass2.tga). Crashday internally only works with uncompressed .tga textures. Whenever it is asked to look for a certain .tga, it first checks whether a .dds alternative is available. You can for example work with .tga files only in your modeling application and even if the in-game textures are only available as .dds, this is no problem.
Every new texture you add requires a shader .tex file with the same name.
In files that are based on user-readable text, the hash character “#” defines the beginning of a comment that ends at the end of the same line. Everything in the comment is ignored by the game.
All files auto-generated for the mods by the game will be put into crashday/user/__tmp00.cpk. You can put those files into your mod later, so it will load faster.
Do NOT use spaces or capital letters in any file names. CD will mostly likely break with those.
CD:RE tools are distributes through Steam. To download the tools head to Steam, right click LIBRARY and select tools. From there locate Crashday Redline SDK and download it. The SDK will be downloaded to your Crashday installation folder and put into the tools folder.
cdtrkconv2
Using this tool you can extract and insert .dbs settings into tracks!
cdtrkhmap
Using this tool you can extract the heightmap of the track.
cdtrkpic
Using this tool you can add and remove track’s embedded picture.
make3ds
This tools converts Crashday’s .p3d model files into Autodesk 3D Studio .3ds files.
makep3d
This tools converts .3ds models into .p3d models.
showcfl
This tools is made to view Crashday’s track piece .cfl files with the in-game engine. Its purpose is to show the track piece in final in-game look, including vegetation and Level Of Detail. Moreover, the tool allows to render AI nodes and link information.
showp3d
This is an utility designed to view any Crashday .p3d model file using the in-game engine.
cdwstool
This tools is used to upload and update mods to the Steam Workshop.

")


