Texturing Guide

Introduction

This page serves as a guide for those wanting to recreate/replicate the textures and texturing methods used for the vanilla contents of the game.

Some of these are the exact methods Moonbyte used when creating the game, but others are merely recreating the textures with more modern and different means.

Partially, this page will refer to modelling or UV-mapping for full explanation of some methods, so some level of 3D- and image editing program skills are required.

Paint.net and Blender will be used as the default softwares here to demonstrate the methods, which more or less can be translated to other programs.

General Tips

  • Most games (which includes Crashday) can most efficiently use texture that are the powers of 2, most commonly 256x256, 512x512, etc.. The aspect ratio can differ from 1:1, (for ex. be 512x256). The vanilla texture dimensions will be explained specifically in parts of the guide.
  • Looking at, and studying vanilla game files plays an essential part in understanding and replicating them, so it’s highly recommended to do so, both when starting out, or with experience, looking to refine your work.

Main Textures

body.tga

body.tga is the main paintable texture on the car.
It’s body.tex uses a diffuse enviroment map shader type, which gives it the reflective clearcoat look. The resolution is 512x512 pixels for all vanilla cars.

It can be divided into 3 main layers:

  • Ambient occlusion (AO) map/texture
  • Doorgaps, details
  • Background Color

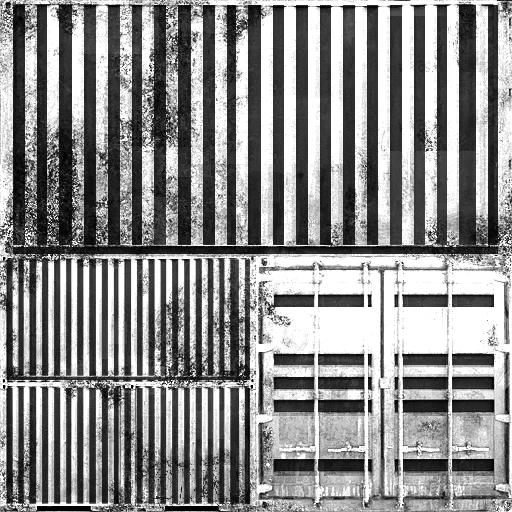
The Ambient occlusion texture can be baked/generated in 3D programs. It’s the natural shading the model receives, from it’s own and surrounding geometry, independent from external lighting.

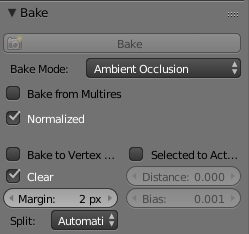
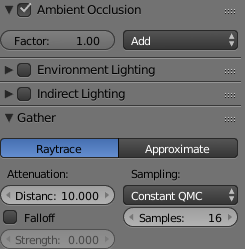
The settings below provide a fast bake and a good base to work on (demonstrated in Blender 2.79):

Render tab

World tab

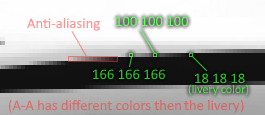
It’s recommended to bake in a 2x or 4x higher resolution (1024x or 2048x) and then downsize the image to 512x in a program of choice, to create natural anti-aliasing on the edges of UV islands and smooth off sharp edges on seemingly smooth parts (caused by normal imperfections). For these reasons, it’s also good to choose a resize type that creates the most blurry result (Bilinear or Fant, but Super Sampling can also work).

Usually, even the downsizing doesn’t make the sharp lines disappear, in which case, a type of Surface Blur needs to be used (Surface Blur named effect itself, or the Smart Blur plugin for Paint.net). For best effect, carefully finetune the Radius and Strenght values, to only blur the neceserary lines, and not get rid of smooth transitions.

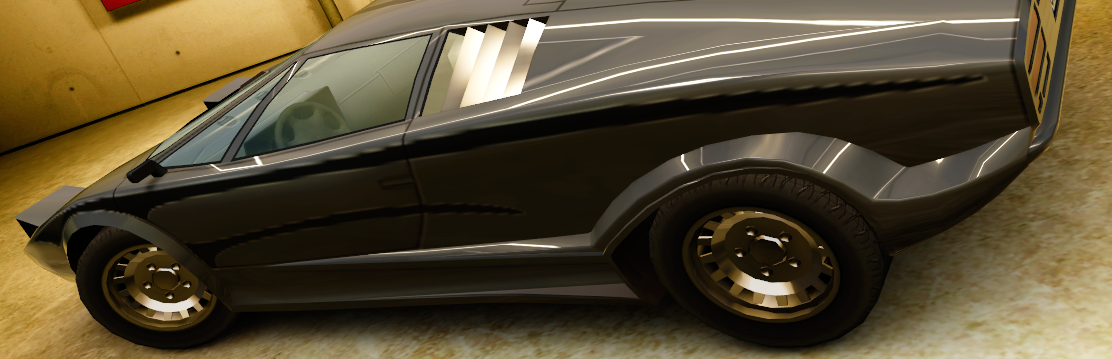
It’s good to have a smooth and pronounced fade from the top of the car from the bottom, for the most vanilla effect, with the top of the car 100% bright, white (about 255 RGB) and the bottom part 50% bright, grey (about 127 RGB). Darker greys can appear for well hidden geometry, but avoid pitch black parts. Use the Brightness/Contrast adjusters for this in your program of choice.

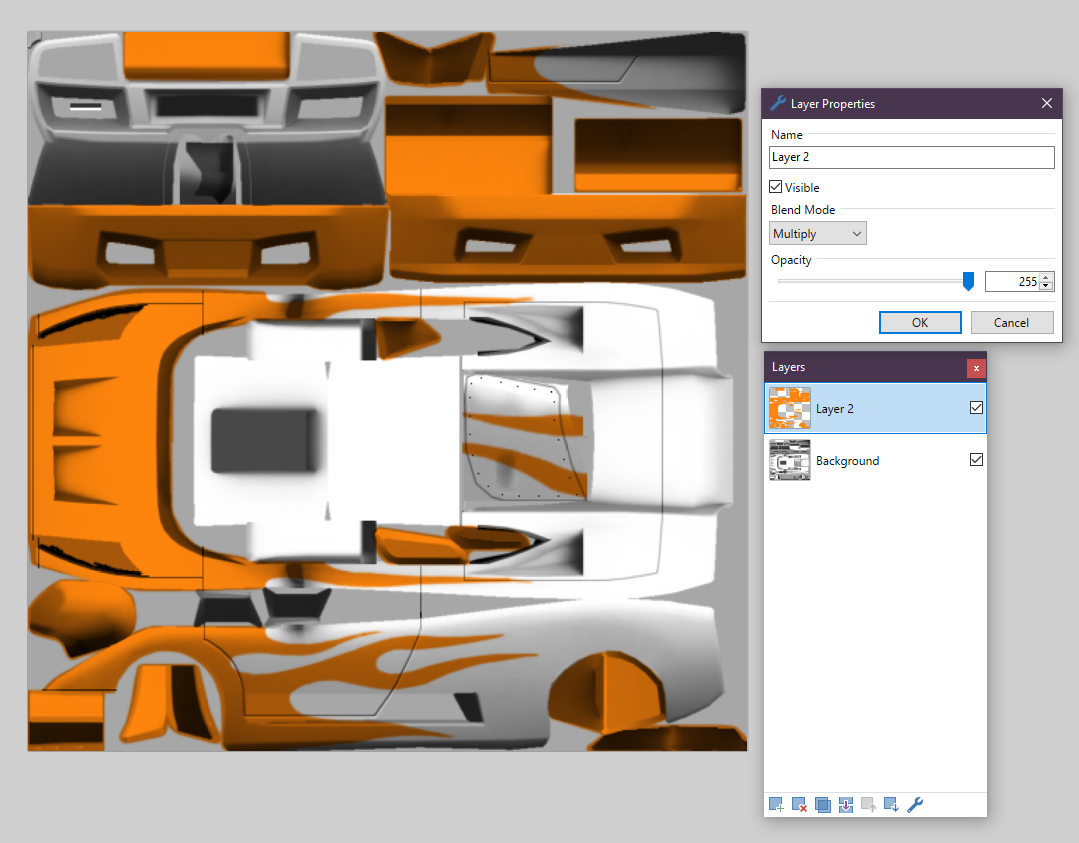
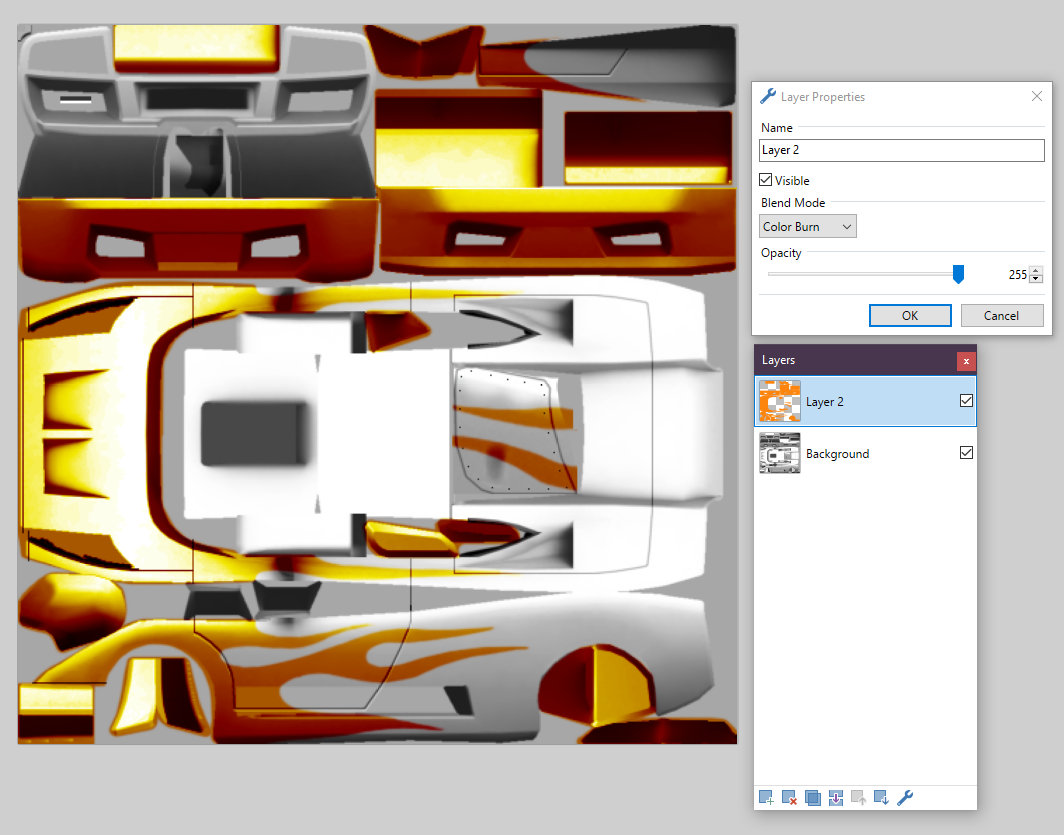
The Doorgap layer(s) is/are self-explanatory. It has to be noted that it darkens according to AO shading in vanilla cars. The best way to replicate that effect so far, is to draw the doorgaps in a 127 RGB grey, and set the layer type to multiply. Altho this will mean that the fake, white emboss/depth effect has to be added on a seperate, in this case additive layer. You can copy the drawn lines from the multiply layer, and offset them 1 pixel in different directions depending on their position, on the additive one for this effect, but either darken their color, or set the latter layer’s opacity to about 110-120 (35%-45%), to make the effect darker. The doorgaps are always drawn with 1 pixel thickness, usually with a line tool.

Other details mean the minigun bolts (1 pixel dots), doorhandles (usually drawn with 1 pixel thickness), or small ventillation holes (like on the ‘Horze or ‘Spitter).

The Background Color is just a simple, single color fill to get rid of the transparency below all the layers above. It should be an average of the greyscale colors on the body, so a somewhat light-mid grey, in case the UV islands show it’s borders/outlines when looking at the car from a distance.

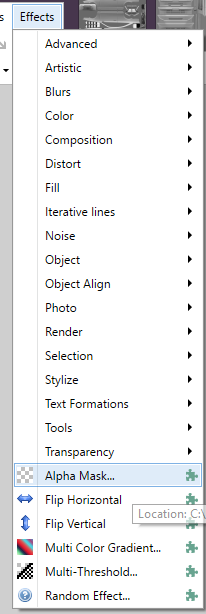
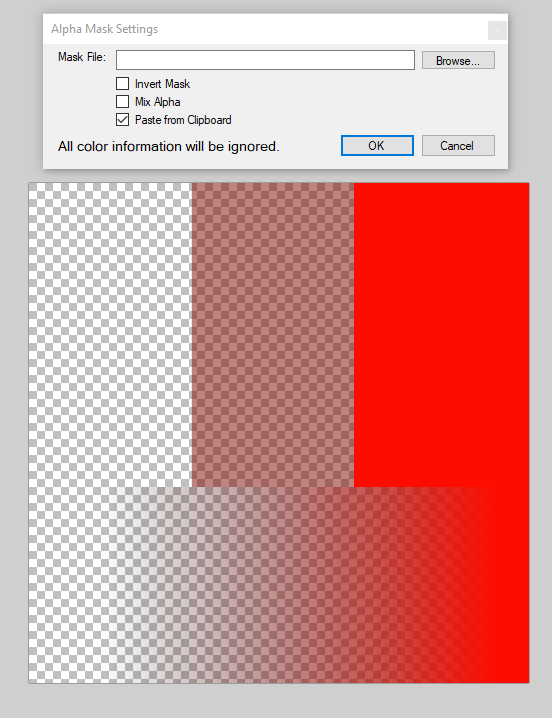
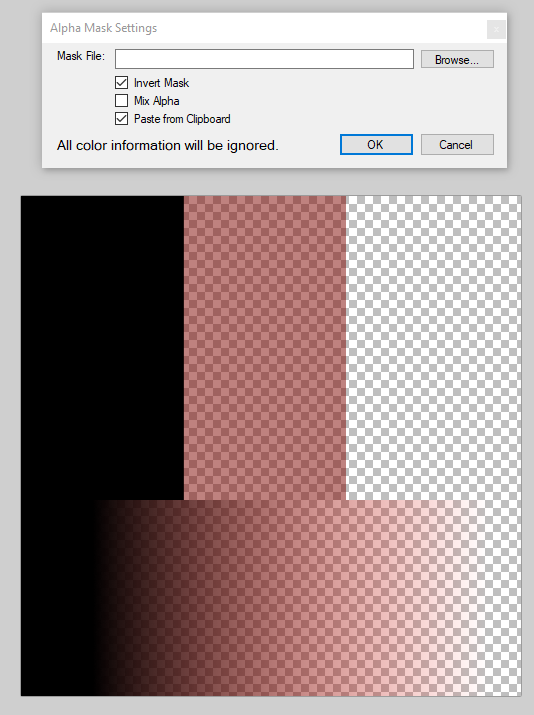
As a last step, the whole of the texture needs to be transparent to be paintable, which means giving it a fully black alpha layer. For an explanation of the alpha channel, visit the Paint.net tips and tricks page.

…TO BE CONTINUED…

Livery realization and creation

Introduction

This page will cover the creation of a livery, both in creating a texture, and placing said livery ingame.
This guide will assume that you already have a basic knowledge of your choosen image edtior, and can follow the more technical terms used.

Files and Textures in general

This part will be compatible with any image or text editing tool you use, as it’ll refer to standard features that can be found in most of these programs.

Files

Liveries, just like all tuning parts, need a .tun and a .lst shop file to function, in addition to the livery texture(s) in content/textures/`carname`/`filename`.tga

Refer to the File Types Documentation section and game files for setting up a new tuning part.\
The prefered format for livery textures is .tga\
Unlike other textures, it’s not needed to create or copy a .tex file for the livery file(s).

There’s a so-so bug in RE where if the .tex file of the livery doesn’t match the body texture’s, it’ll make the game error with a Width == Width message. It’s better to not add a .tex file at all, as it’ll use the texture it’s assigned to’s .tex anyway.

Textures

The method vanilla liveries use for preserving the Ambient Occlusion (shading) on the car texture, is applying the livery on a layer with a Multiply type, which will apply the the colors of the livery to the layer below, in this case, the car body texture.
The side effect of this, is that you’ll need to remove the body texture from the parts you want paintable ingame.

This is where you’ll manipulate the Alpha Channel of the texture once you are done with it. For a more throught explanation of them, visit the Paint.net tips and tricks page (not necessarily made for Paint.net users).

Advanced and specific texture guides

Avoiding anti-aliasing artifacts

You may notice that your textures have white jagged outlines on an otherwise dark colored livery (Judge 4000VT mod for demonstration).

This is because the Anti-Aliasing on the livery isn’t the same color as the livery itself, as it’s applied on top of the light colored body texture.

Technically, only the image you’ll apply as the alpha will need the anti-aliasing, as that one acts as the cut-out for the livery, and defines what part of it appears ingame.

Method 1, Revealing Alpha:

This is the more universal solution for liveries, as it’ll work with most of them, but it will mainly be demonstrated in, and will use Paint.net features, with help of the Alpha Mask plugin.

  • First, the livery needs to be finalized, with a project file saved with the layers still not merged, in case further livery modification is needed for the future.
  • Then, if there are multiple layers for the livery itself, all of them need to be merged into one layer, but without merging them with the body texture itself.
  • Then, an alpha mask needs to be created like normal for the livery, which simplified, is copying the livery layer, creating a new image window, making two layers, coloring the bottom one black, and pasting the livery on the top one, applying a Hue/Saturation (or HSV in some programs) adjustment on the livery layer, with Lightness set to 100 (making the livery layer fully white), then Flattening/Merging the layers.
  • Proceed back to the main image window with the livery and body texture, and use the Alpha Mask plugin Effect on the livery’s layer, with none of the boxes checked. This will make the Anti-Aliasing fully opaque, and getting rid of it in the process. This can make the body texture disappear where the livery isn’t present, but due to the way livery applying is made ingame, it won’t matter (explained later).

    If you happen to have dpy’s plugin pack for Paint.net, you can use Alpha_to_255 in Effects -> Colors on the livery layer, and it’ll have the same effect as Alpha Mask with no box checked.

Demontration:

  • Then, you need to flatten/merge the image, go to the other image window, copy the image to clipboard we made as an Alpha mask in the, go back to the main image window again and use Effects -> Alpha Mask, this time with Paste to Clipboard checked.

The result:

Method 2, Fully Colored Body: W.I.P.

Carlogos

Carlogos for default cars have a consistant style to them that’s art can be replicated. But what reoccuring features there are?

Left part: Default Carlogos, Right Part: Lore-Friendly mod carlogos

From that combined picture you can already see the consistancy shown in default carlogos:

  • The main car name is always in white (except the Spectran because Crashday) and everything has a 1-2 pixel shadow offset.
  • You can also see the variety of fonts used, mainly that the main name’s font often differs from the miscellaneous model names next to it (great examples are the Buster’s and Bornbad’s).
  • A variety of colors are used, with not that much consistancy between them, but they are always used for the model name, or at least part of it. Other colors, like blue don’t actually appear for default cars, but for your creations, a tastefully choosen color can feel just as natural as vanilla logos do (good example is the Cube’s RS, only car to use green).
  • For colors other then white then sometimes you can also notice white outlines given to said shapes or letters, but only in some instances, like the Cube’s RS or the Hunter’s shape/box.
  • The scale and transform of the letters can also vary. Not only some text is marked in bold or italics, you can also see the V8 being much bigger on both cars it’s displayed on, you can see the differing space between Motors‘s letters on the Ironhorze, and the V12 being squashed down on the Incubator, it’s played around with on every carlogo.
  • Lastly, you can also notice simple, small shapes on some of the logos, mainly the Cube’s or Pickup’s, and it’s also used as background for other car’s letters like the Hunter’s and Apachee’s logos.

With all these in mind, and some experience, similiar logos for your (lore-friendly) cars can be created aswell!
You can see some examples on the right side of the image, all of which tried something slightly new, with still being honest to the tecniques above:

  • The Incubator RB’s logo only has a new color introduced, being a darker then usual grey, while still fitting, which proves that there can be experimentation with colors not used in vanilla.
  • The Fireburnz’s only elaborates on this further, intentionally looking similiar to the Firespitter’s logo, but with a still very fitting light blue as an accent color for the modelname.
  • The Trance-Mortar’s tries something new in a different area, being shapes, as it uses a more elaborate, sort of text encapsulating graphic, intentionally showing similiarity to the Cube’s logo, trying to create some continuity with the two cars.

This guide mainly shows the limits of these textures, but I ultimately encourage anybody to get familiar with the lore and style behind it, and with enough creativity, try and push the style a bit more, for nice variety.

Contributing

How to contribute to crashdaycenter.com

Everyone can help in filling crashdaycenter with useful modding info. If you have something to contribute, contact @wurunduk#0001 in official CD discord and ask for access.
When you have access, goto Admin Panel and add your articles. But be sure to follow the guidelines!

Article guidelines

This site uses markdown for content, here is a cheat sheet if you need one: Github markdown cheatsheet
The admin panel also provides a visual editor, so you dont need to edit any markdown if you want.

Here are some rules to use when making articles:

  • “ADD PAGE NAVIGATION” should be enabled only for long articles containing a lot of info. This option adds a ‘Catalogue’ panel on the right based on headers
  • `example` Red highlight should be used for all paths, file names, extensions and to highlight any relevant info
  • > Quote can be used to quote or to highlight an unchecked or unkown information
  • Be sure to correctly categorise a new article. To add an article to Documentation -> Other you would use “Documentation, Other”
  • If you want to add a new category, you can do so. But please tell @wurunduk#0001 so he can fix the ordering in the menus

In general, try to make the content easy readable, split it up into chunks, add images.

Thanks for contributing!

Paint.net tips and tricks

Introduction

Paint.net is a free program and relatively simple in terms of interface and UI compared to it’s other ‘rivals’, like Gimp or Photoshop, while still featuring many tools and features, like layers and effects. Such effects and adjustments can still be expanded thanks to Paint.net’s community based focus and customizable nature, with the help of plugins, some of which are very useful for modding this game. So overall, thanks to it’s simplicity, it’s recommended for beginners, and thanks to it’s customizability it’s very useful to more advanced modders aswell. Download here

With that out of the way, it should be noted that these tips will be more focused for more novice users, who want to improve their work’s quality and/or create mods in similiar quality to the vanilla assets (or even better).

Layer types

These can be chosen by clicking Wrench icon (a.k.a. Properties) on the Layers window, while having your desired layer selected. They are best explained on their official page here, and it’s probably best to look at it in Paint.net yourself for experimenting, but there’s one mode that’s universally used for almost all vanilla game liverys:

Multiply

This, when added to an above layer, takes the colors of the layer below it, and multiplies/mixes them together, making the above layer a sort of mask.

With Normal Blend Mode

With Multiply Blend Mode

This is very useful sort of ‘baking’ liverys onto an Ambient Occlusion baked body texture and if you want to replicate how vanilla game liverys look like, as they were probably made this exact way.

Except one!

Color Burn

Works similiarly to Multiply, except in a way it takes the brightness values of the below layer, being body texture, and somehow applies it to the livery layer’s hue in an amplified way. This is the way the Apachee’s “Wildfire” livery was made.

For the demonstrations below, I took the Wildfire livery, made it fully white with Hue/Saturation, and gave it an orange color with the Color Filter plugin I later tweaked.

This is the livery layer with Multiply

And this is with Color Burn

With some tweaking to Hue/Saturation I could find very close values the “Wildfire” livery used (RGB 254,133,13).
But be aware this method only works with certain colors, like blue or lime-ish colors, but usually tweaking the Lightness and Saturation after changing the Hue with Hue/Saturation, every color can work well.

The Alpha Channel and Masks

To make use of this section, you’ll need the Alpha Mask plugin, if you’ll work in paint.net.

To make most use of the method above and have parts of the car body paintable ingame, you will have to utilize Alpha Masks, but first, a little introduction to the Alpha Layer or Channel itself.

The Alpha Channel is present in any image supporting transparency, and it basically defines how transparent parts of the image should be using the RGB values in the channel. While it can use any type of image, even colored ones as an alpha layer, the channel will always be greyscale when it’s used as an Alpha Layer, so it’s more practical to create the Alpha Masks in black and white, so you even see the exact opacity values easier thanks to the RGB values being the same.

The above mentioned Alpha Mask is the actual image that gets used as an alpha layer for your texture, and when it’s applied, part of the image will turn transparent or half-transparent according to the black and white parts in the Alpha Mask.

Let’s look at a simple example to visualize it:

We have this image I made as an alpha map.

The top part has a 0,0,0, fully Black,

a 50 Lightness, so 127,127,127 Grey,

and a 255,255,255 White.

These will correspond to the Opacity values in an image it gets applied to, so the Black will be 0 Opacity a.k.a. fully transparent, Grey 127 Opacity, so half transparent, and White part 255 Opacity, so not transparent at all. The gradient part will just demonstrate it smoothly.

It will get applied to:

This, which is the same image I copied to a Paint.net New Image. I added a Multiply layer above it, colored it red, to better see the results.

This is where you’ll locate the plugin after installation. You may not have all the tabs above it, but it will always be on the bottom.

You can either put the alpha mask image to clipboard, or save it as .bmp, then you use the plugin on the texture.

If you have it on clipboard, you’ll see it instantly, if not, you just need to open the Mask File in the Effect’s settings like displayed below.

You can see it exactly working like expected, the opacity gets changed according to the uniform RGB values in the black and white alpha mask image.

Note that you can use even colored images as the alpha maps, but the plugin will always see it black and white, since the alpha layer can only work with greyscale colors. For this reason, if you are using a colored image as alpha mask for whatever reason, apply a Black and White from the Adjustments menu so you can see what you are using better.

As for Settings go, you’ll be using the Invert Mask option sometimes aswell, since you could occasionally mix up what black and white stands for, and this is an easy way to fix it without needing to go back to the original image.

Applying Alpha Mask to liveries

So how do you use this for liveries? Well, you can only get the body texture onto the livery by using the technique above, which includes flattening the layers, getting rid of the livery’s transparency in the process, which means no paintable parts ingame.

So to get around it, we are gonna use the Alpha Mask plugin, exactly like it’s demonstrated above.

First, before you Flatten the layers, copy the livery to your clipboard, and paste it to a new paint.net window, which canvas’s size is the same as the livery’s.

Then, create a new layer, put it below the livery’s layer, and color it fully, 000 Black. For the livery layer, open Hue/Saturation in the Adjustments panel, and put the Lightness slider all the way to the right, this will make it a 255, fully white color. After you Flatten (Shift+Ctrl+F) these layers, it will be the image that you’ll use as an Alpha Mask, by either saving this image as a bitmap/.bmp, or copying it to your clipboard.

To make use of it, proceed back to the livery’s window, and provided you set the Layer Type to Multiply, you can Flatten it. Navigate to Effects, then down to Alpha Mask. If you saved the image, open the .bmp with Browse..., if you have it on your clipboard then just have Paste From Clipboard checked. You don’t need to check any of the other options, unless you mixed up the colors in your alpha mask, in which case Invert Mask.

And that’s it. It’s best used for final livery compiles, as it’s a longer process then just simply previewing the livery in a non-paintable, but quick flattened way.

Specular Maps

Almost all track piece textures use the alpha channel for a different purpose, being a sun specularity effect.

This image is the best demonstration of it’s capabilities. It’s the closest effect to a normal map you’ll ever get in Crashday.

The more transparent parts of the texture are, the less specular reflection it gets from the sun’s direction. The color and direction are defined in the ambiences’ files seperately.

If you were to extract the Alpha Layer with a plugin effect like Extract Channel, you can see that the darker a part, the less specularity it receives.

Usually, for concrete and other simple materials, using a low contrast, much darkened version of the texture can easily suffice as a convincing specular map, but don’t hesitate to take examples of vanilla textures’ alpha layers.

Shared Textures

Shared textures are textures that you can use in your model, without needing them in your mod’s .cpk. Every texture that’s located exactly in the textures folder, is considered a shared texture and can be used by any other mod. This includes the textures of all tiles, dynamics, pickups, wheels, drivers, etc.

The most important textures are the ones the base game cars use for miscellaneous parts, like rubber, glass, carplas2. These are just textures with usually a solid color, but with carefully made .tex files to make them look like their name would suggest. It is recommended to use these in your mod, because most of the time it’s a simple time save, but adds much quality. Here’s most of them:

  • “carplas2”
    Perhaps the most commonly used and best looking shared texture, just a simple grey/black plastic texture. Could be used for any simple plastic part and even full bumpers.
  • “carplas3”
    A reflective, black plastic texture. Could be used for the trim on the edges of glass for example. (the part connecting the roof and body on the Apachee for example)
  • “rubber”
    As the name suggest, a black rubber texture. Mostly used to seperate the car body and the windows.
  • “glass”
    Reflective, transparent glass, with a slight bit of a blue tint. Used for car windows. Has a damage map counterpart named “glass2” (use that to UV map your windows to).
  • “carplast”
    A light grey, bright version of carplas2. Rarely seen use on cars.
  • “lighchrm”
    A quite reflective chrome texture. Mainly used for chrome like surfaces in headlights, though can be used for other smaller parts like exhausts or trim pieces.
  • “chrome01”
    The main chrome texture, a slight bit darker and less reflective then lighchrm. This is the intended texture for trim pieces, and other bigger chrome parts. (The Ironhorze’s trim pieces for example)
  • “chrome02”
    An alternative to “chrome01”, slightly brighter version.
  • “colblck”, “colwhite”, “colred” and “colgrey”
    Non reflective, just solid colors of black, white, red and grey respectively.

Making car lights

Firstly, what are overlay meshes and light flares?

Light overlay meshes are meshes that are hidden by default, and only appear when needed. There are 2 kinds of overlay meshes: Headlights and Brakelights.

Headlight meshes serve as the front and rear lights of the car, and will only appear in dark ambiences. These have to be named headl_*something* in your model to work.

Brakelight meshes act as the rear brakelights for your car, and appear in all ambiences, when you apply the brake on your car. These have to be names brakel_*something* in your model

The easiest way of making these is to simply make a copy of the front and rear lights of your car, but can be expanded further, shown by this example here:

Example of how lights work in-game

Now light flares (or omni lights) are not meshes, but rather light object that you add to the model, these add a special lens flare glow effect to the headlights and brakelights.

To add them:

  • In Blender, they are the standard point lamps,
  • in Zmodeler or 3ds max, they are the omni lights.

Side notes:

  • Put them slightly in front of the overlay meshes to work properly.
  • In Blender, if using the Blender .p3d exporter, changing the Color and Energy affects the light in-game.
  • You can assign a maximum of 4 flares to an overlay mesh.
  • Not assigning a flare to an overlay mesh by name will add a permanent, always visible flair.

The naming goes as follows:

Names of the meshes and related lights

The Incubator flares’ positions (Highlighted in orange)

Example lights positions on Incubator

And ingame

Light flares in-game

Launch parameters

Crashday has multiple launch parameters but sadly none were described by the devs. If you find how any of the parameters behave and it is not written here already, let us know!

To launch a game with any of the parameters, right click the game in Steam, select Properties, click “Set Launch Options“. Write any parameters you want, separated with a space.

Here is a list of known parameters:

  • -windowed (Launches the game in window)
  • -skiplauncher (Skip the launcher and load the game with the last used settings)
  • +connect_lobby lobbyid (instantly connect to the lobby with given lobbyid on launch)
  • +connect (unknown? same as +connect_lobby?)
  • +password (use this password when joining a lobby)
  • -watcher
  • -override_mods
  • -show_diffuse
  • -show_shadows (in game will show were textures are applied by the game. Textures will be white)
  • -show_texture
  • -show_alpha (instead of the textures will draw it’s alpha channel)
  • -disable_postfx (disable all screen effects when drawing)

Ambience modding: LUT's

Crashday now supports color LUT’s (Lookup Table) which allow much easier color management for ambience mods. You can think of a LUT as an actual table. Before rendering any frame, the game will get every pixel, take it’s color as a position of the table. Look at our LUT and change the starting pixel to the pixel in the table. Luckily, a lot of modern painting software let’s us work on LUT’s easily.

To get started, download the following neutral color LUT and place it in user/mod_testing/[modname]/content/textures/ambience.

At this point, we should decide which ambience we want to base our mod off of. I’ll choose the Day ambience, meaning I’ll copy the following files from our previously created reference directory content/textures/ambience:

  • day.tex
  • day.tga
  • day_bd.dds
  • day_bg.tex
  • day_lut.tex
  • day_lut.tga
  • dayh.tex
  • dayh.tga

and day.amb from content/ambience

If you want to just slightly adjust the feel of the existing ambience, feel free to open the day_lut.tga with your image editor. But if you want to make new and precise look, replace day_lut.tga with the neutral_lut.tga we downloaded, and open it.

What you are looking at now, is our color Lookup Table. As you might notice, the image has a resolution of 16x16x16. Wait what? Yes. This is actually a color cube, where each axis represents a basic color channel (red, green and blue). After that the cube was sliced on the blue axis and the slices were stacked to the right.

Color cube sliced explanation

As stated before, the game looks at the coordinates of the frame’s pixel and takes the color of the lut at given position. This means, that if you were to make this LUT “negative”, all the 3D rendered objects in the game will appear in negative. Feel free to try it if you’d like!

There are many other things one can do with the LUT, like simulating color blindness (there are mods for that on the Workshop, actually), black and white, sepia effects.

But also we can make really small and nice looking adjustments now. Firstly, we’re going to need to make some reference images. Start the game with mod_testing enabled and making sure to select the Day ambience we are overwriting, take some screenshots that will make good references. Make sure you capture shadows, various greens, industrial tiles, cars, etc. Also make sure you capture them losslessly, using the print-screen button on your keyboard, or otherwise a program that saves them as PNG or BMP will do just fine.

Now import the best reference shots into your picture editing project and create an image of all the useful portions of the reference shots. After doing that, I recommend putting the LUT layer in there in the top-let corner, so we can easily grab it later.

Now we can start adjusting the colors. Using our reference images we’ll be able to tune the colors to get the result we want. Make sure that any color corrections you make are applied to the layer with the LUT!

Please refrain from using tools or plugins that only affect a limited range. This can quickly cause artifacts that will be noticeable in-game. Brightness, Contrast, Hue, Saturation are all great tools. You can also adjust color curves if you wish.

Do NOT use things like blur, glow, sharpen and so forth, as the results of those won’t translate to the game. Remember, we are adjusting colors via a color lookup table. That’s all the game is able to read from the LUT.

When you’re satisfied, go the Canvas Resize the image and Anchor is to the Top-Left. Enter 256 for width and 16 for height. If you put your LUT in the top-left, you’ll end up with only our Color LUT afterwards!

Now save the LUT over the old day_lut.tga and test your ambience in-game! If you still want to make some adjustments, just undo a few steps until you have your reference images back and adjust some more from there.

Publishing and updating workshop items

So you have got your amazing mod or map ready to share with the rest of the world? Nice, you came to the right place.

Publishing to workshop

Mod packing

You only need this step if you are uploading a mod. Head to your user/mod_testing folder and find the mod you want to publish. Now you want to put the contents of that folder into a .zip archive. This step is different depending on what archiver you have, but make sure you are packing into .zip archive. After you have done that make sure that when opening, the only folder there is content. After that rename the extensions of the file to .cpk instead of .zip. Now we are ready to publish it.

Publishing

Launch Crashday tools from Steam or cdwstool.exe from Crashday/tools folder. After the tools are loaded, click Publish Workshop Item. The new window will appear, where you need to fill the mod or map name, description and picture.

  • Title: the name of the track that will be showed in Steam Workshop. Please note that only ASCII characters are supported.
  • Preview: the image of the track or mod as shown in Steam Workshop. Must be JPG or PNG with less than 1MB. Use “Browse…“ to upload the image from your hard drive.
  • Visibility: sets the visibility of your item on Steam Workshop.
  • Tags: for tracks, select checkbox “Track” and leave the other checkboxes rest blank. For mods select one or multiple tags, except “Track” describing your mod.
  • Content: select the .trk map or .cpk package you want to upload. For tracks please note that the name of the file will be displayed as the name of the track in-game as well (e.g. “finals2.trk” will show up as “finals2” in-game)
  • Description: the text description of the item shown in Steam Workshop.
  • Item Id: if you are uploading a new track or mod, leave this blank.
    • If you want to update an existing track or mod, please enter the Id of your previously created Workshop item here. You can obtain the ID from “Your Workshop Items” inside the Mod Uploader tool.
  • Submit: Click this when you are done. Congrats, your mod should be uploaded!
Your browser is out-of-date!

Update your browser to view this website correctly. Update my browser now

×